Wednesday, April 6, 2011

NaNny


If you're unlucky enough, you may have sampled a pixel like the one shown above in After Effects. While 32-bit floating point mode has brought us linear color space and overbrights, it does have a hidden dark side. Negative pixel values can be perplexing, but seeing a NaN (Not a Number) or inf (infinity) floating point value can really make your head spin.

These things can cause all kinds of problems if they find their way into a comp. After Effects has safeguards to prevent them from being created, but they can slip in if your renderer burned them into a floating point format such as OpenEXR.

If you see one of these things, the first thing you should do is write an angry email to the developer of your rendering software, because they have a bug to fix. The second thing is apply our free plug-in, NaNny, which will replace the NaNs and infs with the floating point value of your choosing. Also included in the download is an EXR file chock full of these nasties if you'd like to experiment with them a bit.

Tuesday, May 18, 2010

ProEXR 1.5 released


Now that Adobe has shipped Photoshop and After Effects CS5, it's time for ProEXR to join the party. Available now is version 1.5, complete with 64-bit versions for Mac and Windows. In fact, the Photoshop plug-in has been rewritten from the ground up to take full advantage of all the memory you can throw at it and load those giant EXRs as fast as I know how. As usual, this update is free.

After Effects CS5 ships with 1.5 pre-installed (shout out to my Adobe pals!) and CS3/4 users can update their plug-ins with 32-bit versions, also included.

But wait, there's more. Also included is ProEXR EZ for those Photoshop users who wanted extra alpha control but less multi-layer confusion. Not to mention countless small improvements and optimizations.

Enjoy!

Friday, February 12, 2010

log2lin and lin2log in Photoshop

Some time ago I wrote a couple blog posts about working with Log images in Photoshop and how you can convert them to 32-bit linear for saving out as OpenEXR. It involves a little bit of Photoshop trickery unfortunately, but it works and you can set up actions and scripts to do it in one step, which I'd recommend.

One oversight on my part, however, was not describing how to go from 32-bit linear back to 16-bit Log. It's similar to doing the log2lin steps in reverse, but not quite. So, starting with a good looking 32-bit linear image...

1) Use the Cineon Converter to apply a lin2log operation to each layer. Typically you'll use the default settings, but switch the conversion to lin2log. After you do this, your image will look bright and washed out because it's been converted to Log space but is still getting the gamma correction Photoshop does to all 32-bit images. Don't worry.

2) Here's the tricky part. We have to convert back to 16-bit without Photoshop changing any pixels. During this mode switch, Photoshop converts your linear 32-bit image into whatever color space is set as your default RGB working space. So you have to go into the Color Settings dialog and temporarily change that to the linear color profile you've previously created.
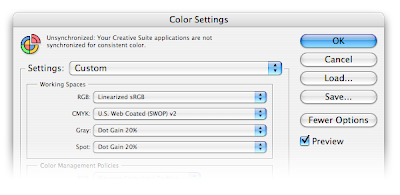


3) Now change the image mode from 32-bit to 16-bit. Thanks to the previous steps, your pixels will now be in 16-bit Log space. When asked about Exposure and Gamma, leave those values untouched (0.0 exposure and 1.0 gamma). The image will not look any different (which is always the preferred behavior for switching image modes) and the pixels will not change values because of that linear profile.

3.5) You probably don't want a linear profile as the default working space, so change your Color Settings back to their original values, usually with sRGB as the default RGB working space. You probably notice this is kind of a pain - all the more reason to script it via JavaScript and Actions.

4) Open the Assign Profile dialog and assign a better profile to this image. If you apply sRGB (or tell Photoshop not the manage the document), you will see the image in Log space. You may also choose another profile to do some sort of film preview, such as the Theater Preview profiles that ship with After Effects.

And that's it. You should be able to start with a 16-bit Log file, use the various steps to convert it to 32-bit linear, use these steps to convert it back to 16-bit log and arrive at exactly the same image you started with, which is always an important test for any color pipeline.


For the record, you're not crazy if you have a 32-bit linear workflow but want to paint in log space. For one thing, many of Photoshop's tools aren't available in 32-bit (hello, Curves?!?). And some of the tools that are in 32-bit have not been appropriately tweaked for linear (I'm looking at you, Levels). Finally, if you have some film preview profiles, Photoshop can't use them in 32-bit mode like After Effects can.

So by painting in Log, you 1) reclaim some of your favorite tools, 2) can use film preview profiles, and 3) can still paint overbrights because 100% white in log space maps to 13.52 in linear. But be careful! Realize that layers will composite in Log space differently than in linear space, especially if you have soft feathered edges or use transfer modes such as Screen. If you flatten your layers before converting to 32-bit this won't be a problem, but if you need the layers to be separate, make sure you test everything first.

Thursday, December 31, 2009

ProEXR 1.5 Beta

Well, 2009 was quite a year. Just before it's over, we have a public beta of ProEXR for Photoshop to try out here.

It's been completely re-written to read and write EXRs as fast as possible, taking advantage of all the memory you've got on your system (including you 64-bit Windows users).

There's also a new "ProEXR EZ" plug-in for people who find the whole multi-layer EXR thing a little overwhelming but want the extra control ProEXR gives you over alpha channels. ProEXR EZ even lets you put the Alpha in the Channels palette, if that floats your boat.

Most users will want to have either regular ProEXR or ProEXR EZ installed, not both. But if you do install both and open a file, ProEXR will be used unless you force EZ in Photoshop's Open dialog. When saving, you can easily pick one or the other.

Please send in bug reports and comments so we can make this the most solid release yet!

Tuesday, November 18, 2008

Cineon Converter for Photoshop


This free plug-in fills a missing link in the Photoshop film production pipeline. It applies Kodak's standard log2lin transfer function to a log Photoshop layer, such as one you might get from opening a Cineon file. This is the same operation found in Nuke, Shake, Fusion, and the After Effects Cineon Converter.

In order to convert a log Photoshop document to a linear one:

1) Convert the document to 32-bit floating point, without altering pixel values.

2) Apply the Cineon Converter to each layer.


The Cineon Converter can be scripted using Photoshop Actions. A sample JavaScript is included showing how to automatically apply an Action to each layer in the file.

Once linearized, your Photoshop document is ready to be saved into a linear floating point file format (can anybody think of one?) and brought into your favorite compositor in the proper color space.

Enjoy!

Download


Wednesday, October 1, 2008

ProEXR ships with After Effects CS4


OK people, this is big, real big.

It's been officially announced: the free OpenEXR plug-ins I've been shipping for over a year are now going to be appearing in the next version of After Effects! So no longer will you have to replace Adobe's plug-in with the fnord one, because they will be the same! EXtractoR and IDentifier will also be included. You can read more about it here, here, here, and here.

And since you asked, yes, they will be remaining open source, and yes, I will continue to update them on the fnord web site as necessary.

Not included in After Effects will be the Comp Creator, which you can still download. And of course, the ProEXR Photoshop plug-in is separate.

This is really a big honor, and I want to thank the AE team for making it happen. I have had a love affair with After Effects for many years and it's hard to believe my plug-ins are now a part of it. Pinch me!

Update: See my credit in the AE secret about box (hold down option/alt while doing About After Effects). Whee!


Tuesday, September 30, 2008

exrdisplay for After Effects

When you work with linear floating point images in virtually any program, the standard conversion from the linear color space to your screen is usually some sort of gamma curve, a standard image operation. But a trained eye may notice that in some cases, OpenEXR files appear slightly differently. One example is the thumbnail previews shown by Mac OS X. In this case, the curve used is from ILM's exrdisplay program. In the sample below, standard gamma is on the left and exrdisplay is on the right:

Notice how in the exrdisplay version, the sky is not completely blown out. Overbright pixels have been brought into range and do not clip as harshly as they would with a standard gamma curve. ILM is using a modified gamma function and added an adjustable "knee" to make this happen.

Ordinarily this different curve was only of passing interest to me, but then I was helping out some friends put together a pipeline for an Inferno, and found that it also uses this curve, which made it necessary to replicate the same color operation in After Effects, which made me write this plug-in:

It has all the same controls as the exrdisplay command-line program, in addition to a few extras. For one thing, the dithering that exrdisplay always uses is optional in the plug-in.

But more interestingly, I've included a checkbox to apply the inverse function. This means you can take a regular image such as a JPEG and convert it to linear space using this plug-in, with control over the knee which will push some brighter pixels into overbrights. And then when you use the plug-in on the other end with the same settings, all values will round trip.

Anyway, I needed this for my personal use, so thought I'd share. Enjoy!

Download
Mac | Win